0%

OpenCV ORB 模板匹配

在某些情况下,我们需要用一个已知的物体,在一个场景内进行匹配,比如有一张身份证,然后想要在桌子上找到他的位置。比如以下两张图片:

身份证图片:
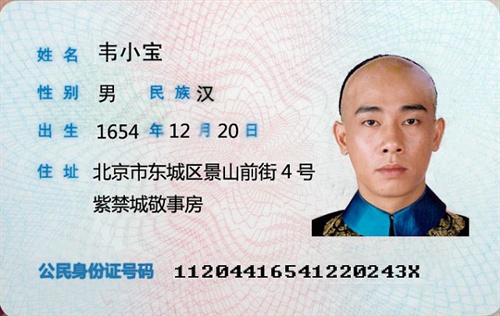
韦小宝

桌子图片:

韦小宝桌子

(什么?没有桌子?哦,不要在意这些细节问题,嗯。)

如果想要从其中桌子图片找到身份证图片的话,我们可以使用 OpenCV 的 ORB特征检测器(SIFT和SURF已获得专利,如果要在实际应用中使用它,则需要支付许可费,而 ORB 速度和性能也不差)。

ORB 的意义

ORB代表“定向FAST”和“旋转简报”。让我们看看FAST和Brief的含义。

特征点检测器分为两部分

  1. 定位器:标识图像上在图像转换(例如平移(移位),缩放(大小增加/减小)和旋转)下稳定的点。定位器找到这些点的x,y坐标。ORB检测器使用的定位器称为FAST。

  2. 描述符:上一步中的定位器仅告诉我们有趣的地方在哪里。特征检测器的第二部分是描述符,该描述符对点的外观进行编码,以便我们可以区分一个特征点。在特征点评估的描述符只是一个数字数组。理想情况下,两个图像中的相同物理点应具有相同的描述符。ORB使用称为BRISK的功能描述符的修改版本。

1
2
节选自 https://www.learnopencv.com/image-alignment-feature-based-using-opencv-c-python/
更加详细的介绍请看原文。

寻找关键点

1
2
3
4
5
6
7
8
9
10
11
12
13
14
15
16
17
18
19
20
21
22
23
// Variables to store keypoints and descriptors
std::vector<KeyPoint> keypoints1, keypoints2;
Mat descriptors1, descriptors2;

// Detect ORB features and compute descriptors.
Ptr<Feature2D> orb = ORB::create(MAX_FEATURES);
orb->detectAndCompute(im1Gray, Mat(), keypoints1, descriptors1);
orb->detectAndCompute(im2Gray, Mat(), keypoints2, descriptors2);

// Match features.
std::vector<DMatch> matches;
Ptr<DescriptorMatcher> matcher = DescriptorMatcher::create("BruteForce-Hamming");
matcher->match(descriptors1, descriptors2, matches, Mat());

// Sort matches by score
std::sort(matches.begin(), matches.end());
// Remove not so good matches
const int numGoodMatches = matches.size() * GOOD_MATCH_PERCENT;
matches.erase(matches.begin() + numGoodMatches, matches.end());

// Draw top matches
Mat imMatches;
drawMatches(im1, keypoints1, im2, keypoints2, matches, imMatches);

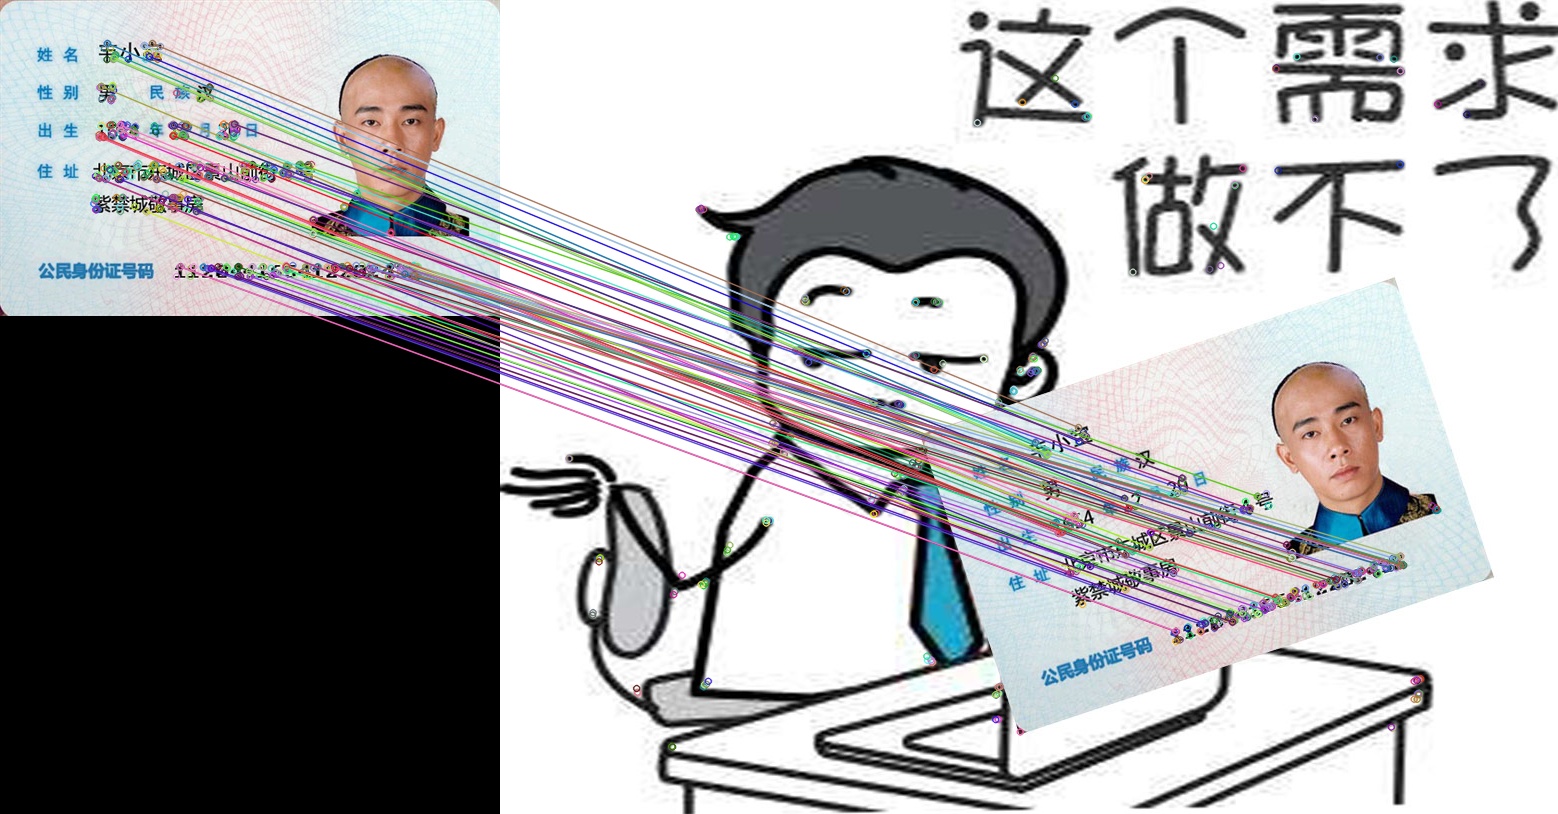
关键点匹配图:
关键点匹配图

寻找目标

通过匹配特征点寻找目标

1
2
3
4
5
6
7
8
9
10
11
12
13
14
15
16
17
18
19
20
21
22
23
24
25
26
27
28
29
30
// Extract location of good matches
std::vector<Point2f> points1, points2;
if (matches.empty())return;

for (size_t i = 0; i < matches.size(); i++) {
points1.push_back(keypoints1[matches[i].queryIdx].pt);
points2.push_back(keypoints2[matches[i].trainIdx].pt);
}

// Find homography
h = findHomography(points1, points2, RANSAC);

Mat img_matches = imMatches.clone();

std::vector<Point2f> obj_corners(4);
obj_corners[0] = Point(0, 0);
obj_corners[1] = Point(im1.cols, 0);
obj_corners[2] = Point(im1.cols, im1.rows);
obj_corners[3] = Point(0, im1.rows);
std::vector<Point2f> scene_corners(4);
perspectiveTransform(obj_corners, scene_corners, h);
//-- Draw lines between the corners (the mapped object in the scene - image_2 )
Point2f offset((float) im1.cols, 0);
line(img_matches, scene_corners[0] + offset, scene_corners[1] + offset, Scalar(0, 255, 0), 4);
line(img_matches, scene_corners[1] + offset, scene_corners[2] + offset, Scalar(0, 255, 0), 4);
line(img_matches, scene_corners[2] + offset, scene_corners[3] + offset, Scalar(0, 255, 0), 4);
line(img_matches, scene_corners[3] + offset, scene_corners[0] + offset, Scalar(0, 255, 0), 4);

// Use homography to warp image
warpPerspective(im1, im1Reg, h, im2.size());

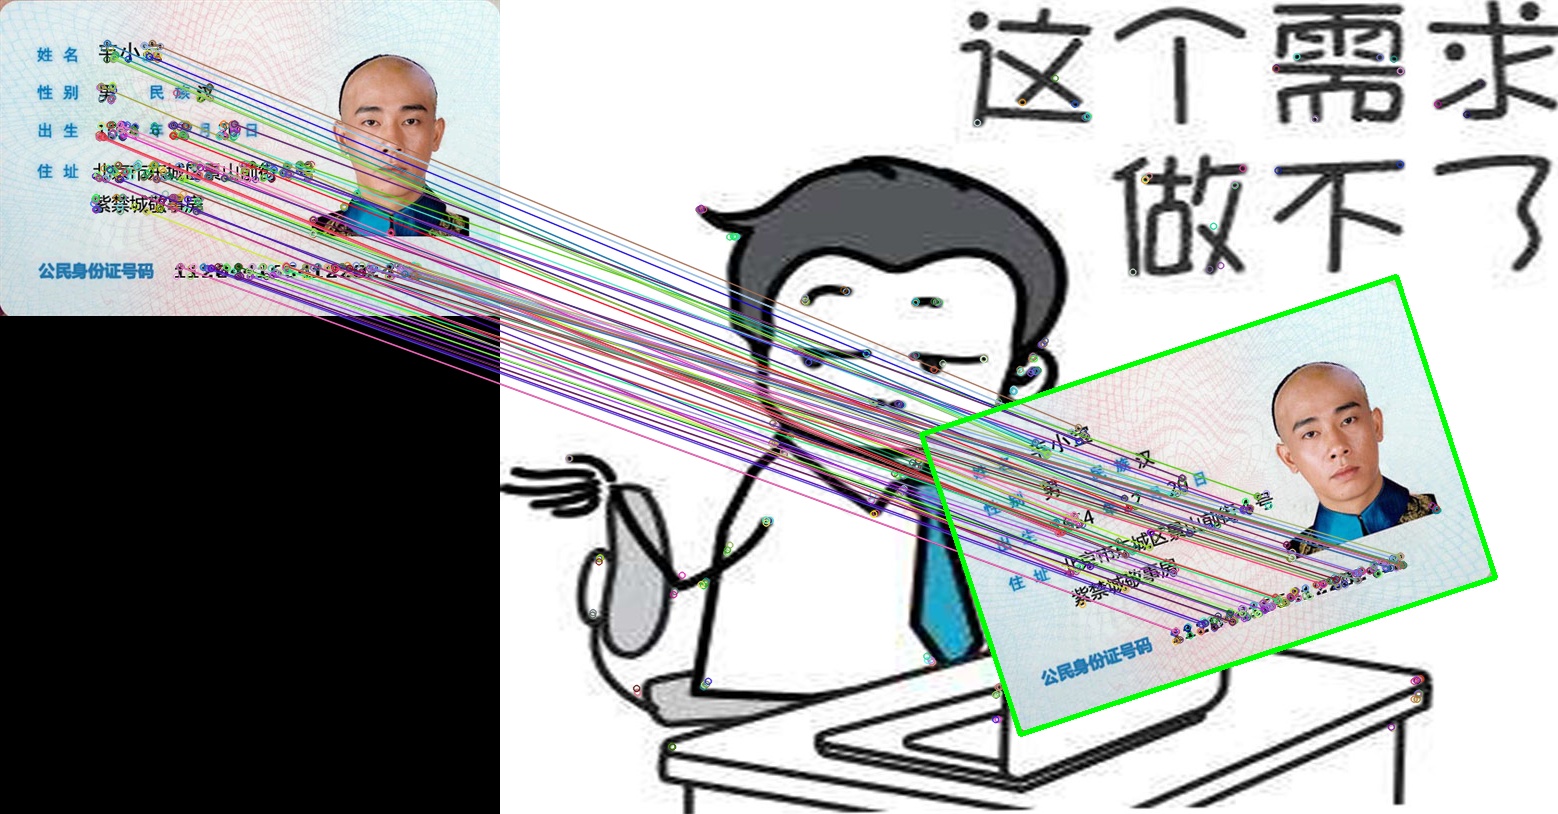
目标查找图:
目标查找图

通过结果可以发现,已经能够桌子上找到身份证了。

从代码可以看到:
perspectiveTransform(obj_corners, scene_corners, h);
可以为我们得到目标的四个顶点坐标,剩下的事情,你知道怎么做的了吧。

参考资料

以上内容基本上参考自文章:https://www.learnopencv.com/image-alignment-feature-based-using-opencv-c-python/ 作者是:萨蒂亚·马利克(SATYA MALLICK)